
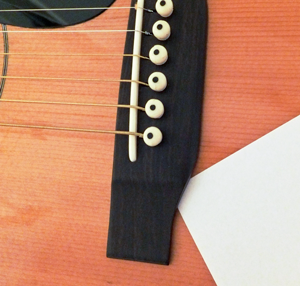
 The acoustic guitar bridge serves many functions on the guitar. It not only sets the placement of the strings, the bridge also plays a crucial role in good tone, action, and intonation. That is why it is important to understand how your acoustic guitar bridge works and how to maintain it.
In this article, I’ll discuss acoustic guitar bridge construction and purpose, how a bridge can break, and how to fix it so your guitar can play great again. Let’s first take a look at what an acoustic guitar bridge does and how it is made.
Guitar Bridge Repair Tools You Will Need
Here is a list of acoustic guitar bridge repair tools that you will need to do most repairs on your acoustic guitar.
Acoustic Guitar Bridge Repair Tool Kit
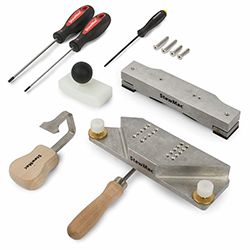 Here is a complete set of tools for doing the most common acoustic guitar bridge repairs. It includes all the tools to steam and remove the bridge as well as tools to clamp and glue it back on the guitar. This set is a must have.
Check the current price!
What does an Acoustic Guitar Bridge do?
Action and intonation
The obvious answer is that it holds the strings in the body. Yes, that is true, but a bridge does much more than that. The bridge is responsible for holding the strings in the guitar’s body and setting the spacing. Small changes in the spacing can make a huge difference to the instrument’s feeling. Perhaps even more important is the guitar bridge. This controls the guitar’s intonation. Depending on the position or the bridge and saddle, the guitar might have perfect intonation or might not be able to be tuned properly. The angle and position of the saddle slot in the bridge is key to setting the intonation of any guitar.
The acoustic guitar bridge also plays a big role in setting the string height or action of the instrument. The action of the guitar is set by the guitar saddle, which sits in the saddle slot on the bridge. I wrote a three-step process to setting the action on an acoustic guitar. Check out the action page for more info about how to lower the action on an acoustic guitar.
Acoustic Guitar Brace
The bridge also acts as a brace to reinforce the guitar body. The majority of acoustic guitar braces can be found on the inside of your guitar. You may not have thought of the bridge as an external brace. The tension on the strings of the guitar causes the internal guitar braces to support the load. The bridge is responsible for the same job, but on the outside. Take a look at the acoustic guitar brace patterns page for more details about guitar braces.
Acoustic Guitar Bridge Construction
Acoustic Guitar Wood
Acoustic guitar bridges are traditionally made out of dense woods like ebony and rosewood. Most high-end guitars feature ebony bridges. Because of its strength and tone, dense wood is a traditional choice. Acoustic guitar bridges take a lot of abuse from the guitar strings. It is important to have a material that will hold up after years of playing.
Since acoustic guitar bridges are small, they are usually carved out of a single piece of wood. There are many configurations for acoustic bridges. Some bridges require pins to hold the strings in place while other string-thru designs hold the strings in place by the string balls. There are many variations in the saddle design of guitars. Some acoustics have multiple saddle pieces while others have straight or compensated saddles.
Even though there is a great deal of variation in acoustic guitar bridge design, the basics are the same. It is a solid piece of wood that is glued directly to the top of the guitar. This is crucial. If you are trying to re-glue a bridge, make sure you completely remove all the finish, old glue, and debris before you try to glue the bridge back on. I’ll talk more about this later in the article.
What causes a guitar bridge to break or become loose?
There are many different reasons why an acoustic guitar bridge can break, crack, or separate from the body. Two main causes are abuse and poor environmental conditions.
Acoustic Guitar Dryness and Humidity
Like with any guitar, the surrounding environment plays a big roll in the life of the guitar. Any form of severe weather can be traumatic to your guitar whether it is hot, cold, humid, or dry. The appearance of your guitar can be affected by environmental factors. This includes cracks in the finish and structural damage.
Guitar Temperature
 Excessive heat can heat up the glue on your acoustic guitar braces causing them to come loose from the body. If the braces are not properly connected to the top of the guitar, your guitar top can warp from the string tension. This is one cause of a loose bridge. If the X braces lose their support and become loose, the top will cave in and place most of the string tension under the bridge. Since the bridge isn’t designed to hold this much weight it can start to peel away from the body.
Overheating can heat up the glue joint of the bridge. If the guitar gets too hot, the glue holding the bridge in place will slowly soften causing the string tension to pull the bridge forward (toward the sound hole). As I mentioned before, bridge placement is a key factor in proper intonation. If the bridge starts sliding forward, your guitar’s intonation might get messed up too.
The moral of the story is never leave your guitar in a hot car during the summer. It doesn’t matter how long you have to run into the store or go pick something up. Don’t do it. A car in the summer is a greenhouse just waiting to melt your guitar. If you are traveling in the summer, keep an eye on your acoustic to avoid any temperature-related problems.
Guitar Humidity
Humidity is just as dangerous to guitars as extreme temperature shifts and swings. Humidity can cause the guitar wood to swell or shrink and crack the finish. High humidity will allow your guitar to absorb more moisture out of the air. The guitar wood will fill up with water and expand while the hardened finish on the guitar will stay a constant size. The wood’s expansion can cause cracks in the finish.
Acoustic guitars can be affected by high humidity, but guitar bridges can be damaged by low humidity. Electric guitar wood suffers from low humidity. The guitar wood shrinks and dries while the hardened finish retains its shape. If a guitar is dry enough, the top will turn into a concave shape bowing down in the middle where the bridge is glued. This can cause the bridge to come loose. The ideal humidity level is about 50% according to most luthiers. It can be a little more or a little less, but this is a good rule of thumb. During dry winter months, you may need to place a humidifier in your guitar case in order to maintain the humidity around 50 percent.
Improper Gluing
In order for any glue joint to hold up under extreme pressure, it has to be prepped and cleaned properly. This is also true for guitar bridges. If the top of the guitar wasn’t cleaned and sanded properly before the bridge was glued on, you might have a problem with this later. This can happen when someone wants to replace his or her bridge with another one. Instead of properly cleaning the top of the guitar they just rip off the old one and glue on a new one. Most likely there is still finish on the guitar top and the new bridge won’t properly adhere to the guitar body.
Cracked and Warped Bridges
Usually guitar bridges don’t have a problem cracking or warping because they are glued to the guitar top. Unfortunately, once the bridge has pulled away from the body, it doesn’t have the support of the guitar. While the bridge is peeling away from the body, it can warp from the tension of the strings or even crack. Extremely dry conditions may also lead to cracks.
Cracked Guitar Bridge Plates
The bridge plate is a brace or plate that is glued directly under the bridge to help support the tension of the guitar strings. It is not uncommon for these to have the same problems as the bridge. A cracked bridge plate usually has to be replaced instead of reglued.
How to Fix a Loose Acoustic Guitar Bridge
Now that we have covered the possible problems, let’s take a look at how to fix your guitar bridge.
Diagnose the Problem
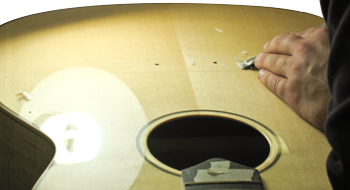
 If your bridge is loose or cracked, you will need to remove it from the body and re-glue it or replace it. Take a look at the back of the bridge. Can you see a gap in between the bridge and the body? If it is, it means that something has gone wrong. Sometimes the gap is so small that you can’t see if easily. Take a piece of paper and slide it between the bridge and the body. If the bridge is properly glued, the paper shouldn’t be able to get between them.
Once you determine that you have to remove the bridge, get a card stock piece of paper and trace the bridge out on it. Cut the bridge from the paper. You can place the piece of paper down around the bridge like a guard while you are removing it to protect the finish.
Remove the Bridge
Heat up the Glue
After you have taken a loose at your loose bridge, you will most likely need to remove the whole thing. There are many ways to do this. You can place a heating pad on top of the bridge for a minute or so to heat the glue up. If you don’t want to buy a heating pad, you can also use a clothes iron with a towel to cover the bridge. Be careful, no matter what you choose. You don’t want to heat the guitar top up too much. You could cause the braces to come loose or damage the finish on the top of the guitar.
Peel away the Bridge
After the glue is warm and loose, you can take a flexible, blunt putty knife and work it between the bridge and the body. Be careful not to damage the finish in the process. You may have to heat it a few times to get the putty knife all the way across the bridge. Take it slow and take it all in. You don’t want to over heat things and you don’t want to slip with the knife.
Clean the Joint
Clean the Body
 Clean the wood is one of the most important steps when gluing anything. First, you have to know exactly where to clean. I like to line the bridge up with dowel pins (like I talk about in the next section) and place the bridge on the guitar with double stick tape. This will secure the bridge. Now I take a scribe or X-acto knife and cut a line in the finish around the bridge. Once you have scored the finish, you can use masking tape to outline the body around it. This will protect your finish while you clean.
Next, take out the bridge and begin cleaning the guitar’s top. I usually use a chisel to scrape off the excess glue on the guitar top. Make sure not to slip with the chisel. You only want to remove the glue and finish from underneath the bridge.
Clean the Bridge
Cleaning the bridge is just as important as cleaning the body. You can use some sand paper to remove the glue on the bottom of the bridge. Since the top of the guitar is bent into a slight radius, you will need to match that with the bridge. Acoustic guitar tops are made with all types of radii ranging from 15′ to 100 foot. Measure the radius of your guitar top and buy a matching radius block. You can put stick sand paper on the radius block to sand the perfect shape into the bridge.
Bridge Placement
 It is extremely important to line your bridge up properly before your glue it down. Otherwise, you might have to redo everything. I like to measure and mark the centerline of the bridge on the bottom and front side. This allows me to align the centerline of my guitar’s body with the bridge’s centerline.
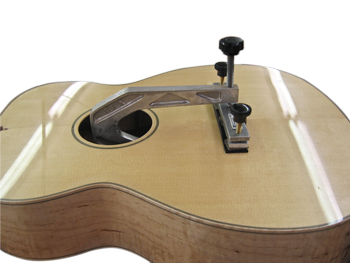
Since this is the not the first time a bridge has been glued on the guitar, there will be bridge pin holes drilled in the top of the guitar. I place a wooden dowel in the first and last string holes of the bridge to line it up with the placement of the old bridge. After the bridge has been glued, it is possible to drill out the dowels. The picture to the left is of a guitar that I built. As you can see, I have drilled the first and last strings holes for dowel placement.
Dry Run
 Once the bridge and the body are completely cleaned, you should clamp them together without any glue. I call this a dry run. Whenever you are gluing anything important on a guitar, you should do a dry run. This will allow you to check if your clamping ideas, cauls, or clamps are working properly. Trust me; you don’t want to put glue on the guitar get it all clamped up and find out that something is wrong. Scrape the glue you have just cleaned.
You’ll need a deep c-clamp in order to clamp the bridge in place. You will also want to make a special caul that will fit the inside of the guitar on the bridge plate between the X-braces. You can achieve the right pressure without causing damage. I usually just cut and shape a 1×4 board to fit in between the X-braces.
Glue the Guitar Bridge
 After a successful dry run, you can apply the glue. Titebond wood glue is what I use. On most glue joints I say to go sparingly on the glue-not this joint. The bridge has to be securely jointed with the body.
Make sure to put a good amount of glue on the body and clamp the bridge down just like the dry run.
Tighten down the clamp until you start to see a good amount of glue squeezing out of the seam.
Wipe off the Excess Glue
I usually use a damp cloth or paper towel to wipe off the excess squeeze out. Make sure to wipe it away immediately. You don’t want it to harden and ruin the finish. I usually like to let the bridge set up over night. This way there is plenty of time for the glue to dry. Take the clamps off the next day and you are ready to restring your guitar. Just make sure to be careful removing the clamp and caul. It is very easy to dent the inside of the sound hole with a deep c-clamp.
Now your bridge is re-glued and ready to be strung up. Time to restring your guitar and start playing again.
Related articles:
- How to remove guitar frets
- How to finish an electric guitar
- How to fret an electric guitar
- What glue should I use to glue in fretboard binding
- How to fix acoustic guitar binding around the body